I've been trying to make electronic fireflies for ages now, and most of my previous attempts involved RGB LEDs, and one of them per ATtiny13 with code to flash a random colour now and again. This was always going to be a pretty expensive method, but after seeing http://www.instructables.com/id/Jar-of-Fireflies/ I realised it would be a much better idea to have one ATtiny13 control /many/ LEDs.
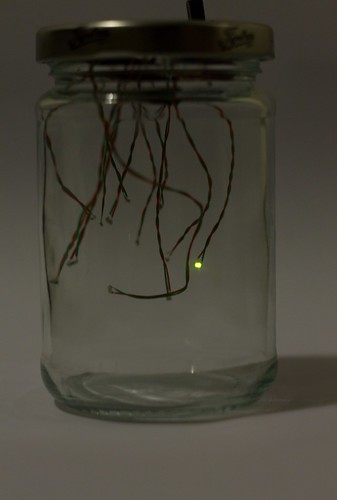
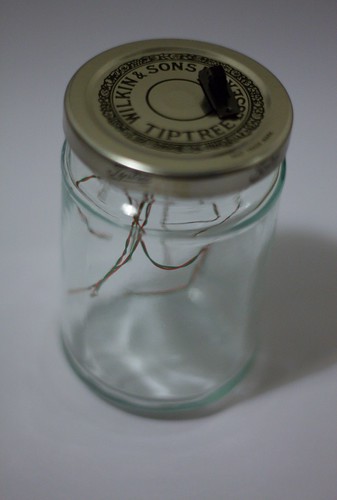
I wanted the first one to be in a jar, but in future I plan to have much longer wires so that I get one controller PCB and 12 fireflies extending off to cover a corner of a room, or part of a ceiling, etc. I could even add an LDR so it can detect dark, possibly by using pin 1 (so the chips couldn't easily be reprogrammed).
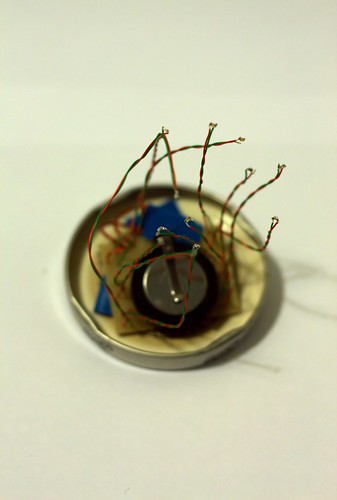
The circuit schematic is kind of odd: I took a normal 2x3 matrix, where PB0 and PB1 control the two columns (as they can do PWM, so all LEDs can be PWM controlled), and added another LED for each position but in reverse. Since all the ouputs can tri-state (where effectively they act as though they were not connected), I can light up any LED I want individually.
While I could easily extend this to a full charlieplexing scheme, that would mean losing the hardware PWM for every LED. I could easily add another two LEDs between PB0 and PB1, but it's really not worth the added complexity - 12 is plenty!
Each LED is an 0603 green LED soldered to two very thin wires, which run to a home made PCB at the top of the jar. The battery holder is a standard kind of cell holder from Rapid, and on the other side of the PCB is the ATtiny13 (soldered to the solder-side directly) and two 180 ohm resistors. The entire thing is through-the-hole because I don't have any surface mounted ATtiny13s lying around and did have loads of 180 ohm through the hole resistors.
The code is fairly simple: in an infinite loop it chooses one LED at random, lights it up following a rough sine wave (actually modeled on a real firefly flash!) and then might repeat it once or twice, then waits a random amount of time before doing the whole thing again.
Each time the thing is turned on, a value is read from 0x00 in the internal EEPROM memory and used as the seed for the PRNG, then incremented and stored - giving 255 different patterns, more than enough that you can't see any repetition!
By far the most difficult part of this was soldering all the tiny LEDs - if it wasn't for that, this would be a particularly easy project to pull off. Using normal through-the-hole LEDs is an option, or even LED holders which would solder to the PCB and an LED just slots in. Surface mount ones are small enough to be less noticable and look better when lit up, though.
Eagle schematic and PCB file, C source code and compiled hex file available at: link all files are released under CC BY-SA-NC license